
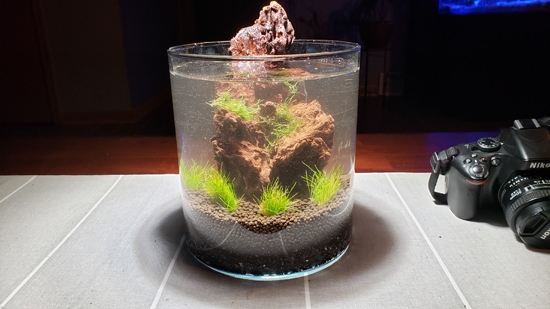
Putting together a jarrarium, as simple as it may seem, can be intimidating at first. Luckily, once all the material is collected it becomes really simple. It seems to be a growing hobby and it is quite a lot of fun to put together. This is a step-by-step jarrarium guide that will hopefully give you a good idea of how to put together an eye-catching jar.
Due to their small footprint, a jarrarium will begin to look quite cluttered when adding equipment. A preset heater is highly recommended to help keep a stable water temperature, but it is not required if your residence is consistently at a set temperature. Adding filtration is not too common. Many jarrariums rely on water changes to maintain good water quality.
Step 1: Finding a Container
We of course need to begin with acquiring a jar for the new jarrarium. Glass containers are most commonly used. I have seen old glass bottles, vases, ice buckets, and so many more things used as a jarrarium. I do my best to have my jar be at least 1 gallon but smaller or larger is always a possibility.

The most important thing is to make sure that the container is clean! DO NOT use soap when cleaning. At most use vinegar and then thoroughly rinse the container. Once the container is ready we can move on to the next step.
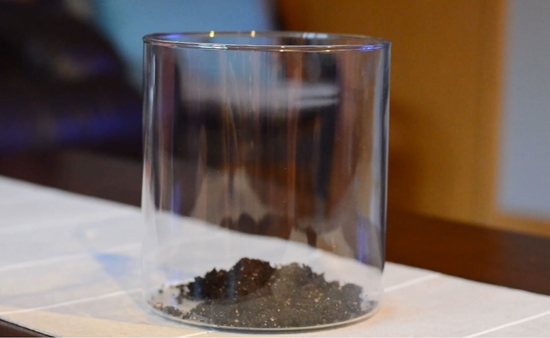
Step 2: Adding Soil
Once we have the glass ready it is time to add some soil! I would recommend adding organic soil with compost into your jar. Avoid soils with fertilizer because it may add undesirable nutrients to your jarrarium. Also, certain soils with fertilizers may not be good for the inhabitants of your new jar. While adding the soil be sure to compact it down in an attempt to remove any air bubbles. About an inch of soil should be present once it is compacted.
Once the jar is up and running it is highly recommended not to disturb the soil portion of your setup. In a few steps we will be adding a “seal” to prevent the soil from getting out but for now, let’s move onto adding the hardscape.
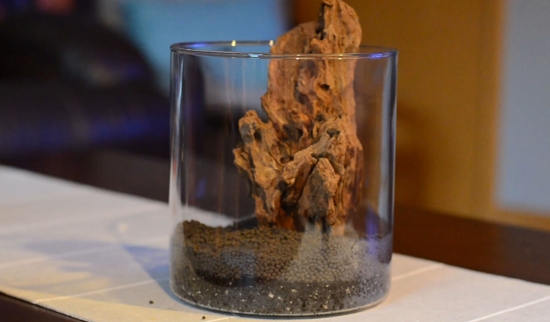
Step 3: Adding the Hardscape
Many different types of hardscapes can be used for a jarrarium. I used a piece of driftwood when I was putting together this one. Be mindful that it is preferred to boil or soak your driftwood before adding it into an aquarium or jarrarium otherwise, it runs the risk of releasing tannins into the enclosure. The tannin is not dangerous but it causes the water to look yellow or brown for a long period. Large pieces of driftwood can be used or spindly spider wood can be used.

Rocks are also commonly used for an enclosure. Be mindful, because rocks that are made of limestone will raise your pH and water hardness levels, which may be undesirable when keeping live plants. Common rocks that are used are river rocks or lava rocks. Check out local fish stores for rock options.
Lastly, a jarrarium can have any aquarium decor that will fit into it for decoration. A tiny pirate ship, skulls, pillars, etc. are fair game but make sure that it will fit or at least not crowd the whole enclosure. With any of the decorations, make sure that it is firmly touching the bottom of the jar for stability.
Step 4: Adding the Seal
Now is the time to add substrate to seal the soil. I recommend adding 1″ of a substrate on top of the soil. In this jar, I used Fluval Stratum, but other substrates can be added such as the Eco-Complete planted aquarium substrate!
The substrate will seal the soil in place to help prevent it from floating up and leaching nutrients but it will also allow plant roots to reach down there and use what nutrients are in the soil. We will have to be careful when adding water to not disturb the soil and substrate!
Step 5: Adding a Portion of Water
Steps 5 and 6 can honestly be interchanged. I chose to add roughly a third of water into the jarrarium before adding plants. I did this to see whether my substrate sealed the soil correctly and I also wanted to have some water in the jar before adding plants. As stated above, be sure not to allow your substrate to be disturbed! You do not want the soil to get kicked up.
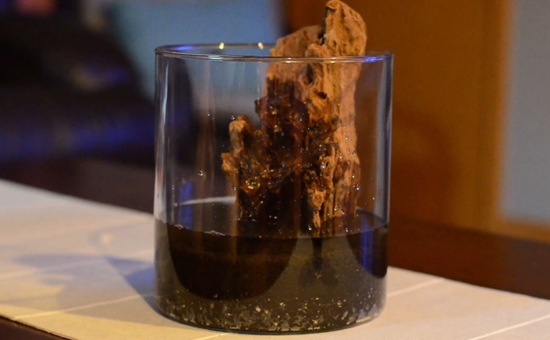
Allow the water to run down your decoration or create a strainer to let the water trickle down. A cheap way to make a strainer is to poke holes in the bottom of a plastic bottle and pour the water into there. The water will probably get a little murky. After a few days, most of the murkiness should settle.
Step 6: Planting
Adding plants is probably my favorite part of putting together a jarrarium. It brings the enclosure to life! You can always experiment with many different plants but to start I would recommend adding a low light Anubias, some riccia for the foreground, and perhaps some java moss. This is a great way to dip your toes into keeping live plants in an aquarium-type setting.
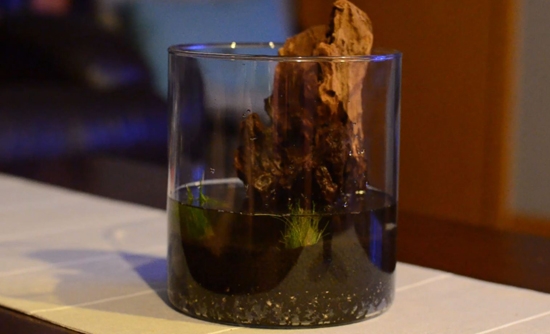
In this enclosure, I have dwarf hair grass and moss but I am only experimenting to see how well they do. If they do not grow well I may swap out the dwarf hair grass with an easier-to-keep plant.
Step 7: Filling to the Top
Now it is time to finally fill this jarrarium to the top! Use your strainer or piece of decoration and slowly and gently fill it with water. Once the water has reached your desired height, you are done with setting up your new jarrarium!
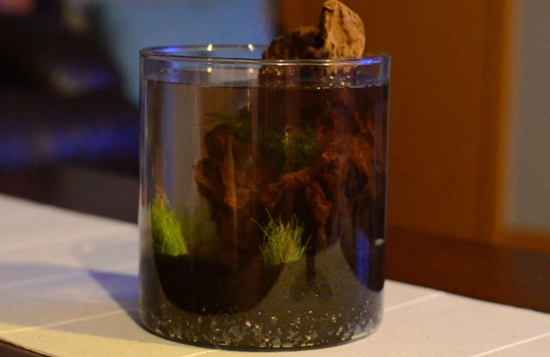
The jar may be murky or discolored. Give this a few days to pass. The substrate and the tiny soil particles will settle and the coloration should clear up! Throw in a few pieces of fish food to begin the nitrogen cycle and begin considering what livestock to add to the enclosure. Also, consider adding an artificial light source and avoid having your jar too close to a window. A light fixture with a CFL bulb will suffice. There isn’t a need to go out and spend hundreds of dollars on a light fixture. Being so small with the potential of having swinging water parameters we will be limited to what can be added to the jar. I would only recommend small shrimp and snails for anything smaller than 5 gallons. At 5 gallons a betta fish could be added with a heater.
Final Notes
There are a few things I would highly recommend purchasing when setting up a jarrarium or any aquarium for that matter. An API Freshwater Master Test Kit can be used to keep track of ammonia levels, nitrates, and so on. This is important for really small enclosures such as this. It is also important to have while your jarrarium is going through the nitrogen cycle which takes roughly 6 weeks. During this time we will allow the food we threw in to decompose and we will not add any livestock. Only top off the water as it evaporates and do not replace any water during the cycle. The nitrogen cycle is completed when your test kits read 0 ammonia, 0 nitrites, and a hint of nitrates (10 ppm).
A water conditioner, like the API Tap Water Conditioner, is recommended if using tap water to remove unwanted chlorine from your water. This will help make the water stable for your little critters. Other than that, just a few things like shrimp food, nets, and buckets should be kept. Lastly, enjoy experimenting with your new jarrarium! Hopefully, this guide gave a good idea of how to put one together!
Check out this video of me putting together this jarrarium: